")
")
Sooner or later, your growing program will want you to create a menu where your users can pre-set values and settings can be stored. Luckily, Kivy has this helpful functionality already on board. I will show you how to get started with settings in Kivy in two possible ways.
Basics
It always starts with a JSON file where you define the structure and contents of your menu. In general you can choose from five pre-defined types.
- File path
- Boolean values
- Options
- Numeric Values
- Strings
These values will be enriched with a title for your user to identify the option a description where you can add more information, the so called section which can be used to sub divide the settings and a key which will be used in your code to identify the item
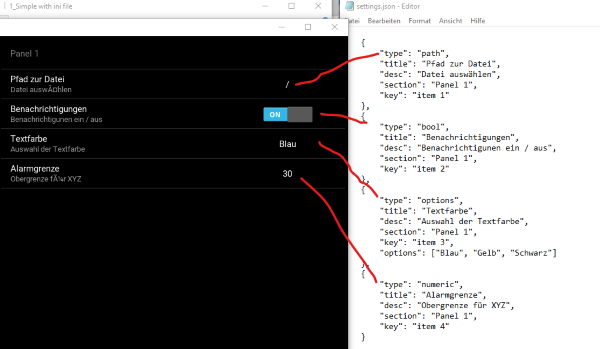
This is how the settings.json file for the screenshot above has to look like.
[
    {
        "type": "path",
        "title": "Pfad zur Datei",
        "desc": "Datei auswählen",
        "section": "Panel 1",
        "key": "item 1"
    },
    {
        "type": "bool",
        "title": "Benachrichtigungen",
        "desc": "Benachrichtigunen ein / aus",
        "section": "Panel 1",
        "key": "item 2"
    },
    {
        "type": "options",
        "title": "Textfarbe",
        "desc": "Auswahl der Textfarbe",
        "section": "Panel 1",
        "key": "item 3",
        "options": ["Blau", "Gelb", "Schwarz"]
    },
    {
        "type": "numeric",
        "title": "Alarmgrenze",
        "desc": "Obergrenze für XYZ",
        "section": "Panel 1",
        "key": "item 4"
    }
]
Version 1
The first and in my opionion simplest way requires an .ini file which holds the values which are defined in the menu.
mysettings.ini
[Panel 1]
item 1 = /
item 2 = 1
item 3 = Blau
item 4 = 30
Important: Make sure you are strictly following the strucure of your settings.json file. Pay attention that you list the items in the correct order and that there are no missing values. Otherwise will you get an error during parsing.
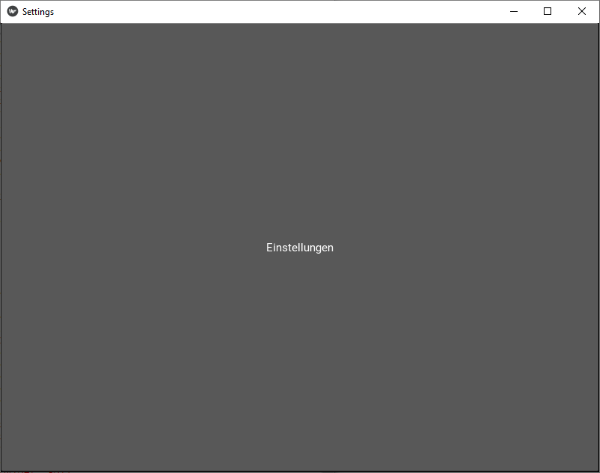
Now can we start to create a little demo app. our .kv file defines a BoxLayout which holds a button which will open the menu once we click it.
settings.kv
BoxLayout:
    orientation: 'vertical'
    Button:
        text: 'Einstellungen'
        on_release: app.open_settings()
settingsApp.py
# -*- coding: utf-8 -*-

from kivy.app import App
from kivy.uix.settings import SettingsWithSidebar

class SettingsApp(App):
    def build(self):
        self.settings_cls = SettingsWithSidebar
        #Read the config from file
        self.config.read('mysettings.ini')

    def build_settings(self, settings):
        '''The json file will be loaded and constructs the layout of the menu'''
        settings.add_json_panel('Panel 1', self.config, 'settings.json')

SettingsApp().run()
In the .py file are two things going on. By overwriting the build() function and build_settings() function are we making Kivy read our files and construct the menu accoringly.
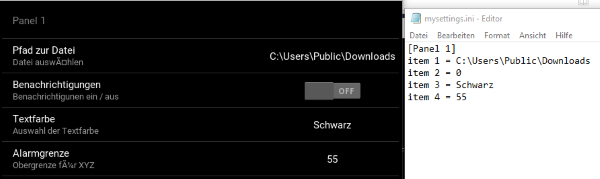
Run the program and press the button. You will see that we have simply added another panel to the existing Kivy standard panel.
![]()
After playing with the values for a time, a question might come to your mind. What is going to happen with the values after I close the menu or restart my app???
The answer is simple. The values are stored in themysetting.ini.
Version 2
This version is going to save you the manual creation of the .ini file. However you will have to define the start values within the .py file of your app. Simple as it is you only overwrite the build_config() function and add the same definition as in our previous mysettins.ini file.
# -*- coding: utf-8 -*-

from kivy.app import App
from kivy.uix.settings import SettingsWithSpinner


class SettingsApp(App):
    def build(self):
        self.settings_cls = SettingsWithSpinner

    def build_config(self, config):
        config.adddefaultsection('Panel 1')
        config.setdefaults('Panel 1',
                           {'item 1': '/',
                            'item 2': 'False',
                            'item 3': 'None',
                            'item 4':'25'})

    def build_settings(self, settings):
        '''The json file will be loaded and constructs the layout of the menu'''
        settings.add_json_panel('Panel 1', self.config, 'settings.json')

SettingsApp().run()
You may notice that your root folder of the app gets an .ini file once you run the program. Kivy is now going to look the values up from there and will ignore the star values you have created in the .py file.
Others
After having a working menu will a couple of questions come up.
- How can I access the values in the menu?
- Can i automatically react to changes in the menu values?
- Can I change the look of the menu?
The answer to all those questions is yes. Let's make our sample program a bit more fun by adding all these functions.
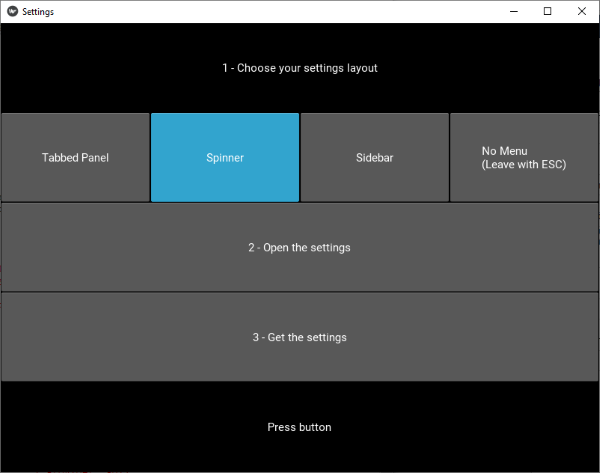
There are a couple of pre-defined looks of the menu. They have fancy names like Spinner, Tabbed Panel, Side bar and No Menu. The app let's you choose which layout you want and you can inspect the effects by opening the settings.
In addition will we update the color of a label depending on the menu values and we will access the values in the program by pressing a button.
BoxLayout:
    orientation: 'vertical'
    Label:
        text: '1 - Choose your settings layout'
    BoxLayout:
        orientation: 'horizontal'
        ToggleButton:
            id: TabbedPanel
            text: 'Tabbed Panel'
            on_press:
                app.set_type('TabbedPanel')
                app.untoggle('TabbedPanel')
        ToggleButton:
            id: Spinner
            text: 'Spinner'
            on_press:
                app.set_type('Spinner')
                app.untoggle('Spinner')
        ToggleButton:
            id: Sidebar
            text: 'Sidebar'
            on_press:
                app.set_type('Sidebar')
                app.untoggle('Sidebar')
        ToggleButton:
            id: NoMenu
            text: 'No Menu\n(Leave with ESC)'
            on_press:
                app.set_type('NoMenu')
                app.untoggle('NoMenu')
    Button:
        text: '2 - Open the settings'
        on_release: app.open_settings()
    Button:
        text: '3 - Get the settings'
        id: read_menu
        on_release: app.print_current_settings()
    Label:
        text: 'Press button'
        id: settings_content
# -*- coding: utf-8 -*-

from kivy.app import App
from kivy.uix.settings import SettingsWithTabbedPanel
from kivy.uix.settings import SettingsWithSpinner
from kivy.uix.settings import SettingsWithSidebar
from kivy.uix.settings import SettingsWithNoMenu
from kivy.uix.togglebutton import ToggleButton


class SettingsApp(App):

    choices = {'TabbedPanel': SettingsWithTabbedPanel,
               'Spinner': SettingsWithSpinner,
               'Sidebar' : SettingsWithSidebar,
               'NoMenu': SettingsWithNoMenu}

    def build(self):
        self.settings_cls = SettingsWithSidebar
        self.config.read('mysettings.ini')

    def build_settings(self, settings):
        '''The json file will be loaded and constructs the layout of the menu'''
        settings.add_json_panel('Panel 1', self.config, 'settings.json')

    def set_type(self, settings_type):
        #old layout needs to be removed or nothing will be updated
        self.destroy_settings()
        #set chosen layout
        self.settings_cls = self.choices[settings_type]

    def untoggle(self, active_button):
        buttons = ('TabbedPanel', 'Spinner', 'Sidebar', 'NoMenu')

        for button in buttons:
            if button != active_button:
                self.get_running_app().root.ids[button].state = 'normal'

    def print_current_settings(self):
        #get all items of the settings
        items = self.config.items('Panel 1')

        #loop over the items and print them to the label
        text = ''
        for item in items:
            text = text + self.config.get('Panel 1', item[0]) + '\n'

        self.root.ids['settings_content'].text = text

    def on_config_change(self, config, section, key, value):
        print('config has changed.\nsection: {}, key: {}, new value: {}'. format(section, key, value))
        if key == 'item 3':
            if value == 'Blau':
                self.root.ids['settings_content'].color = (0,0,1,1)
                print('Blue selected')
            if value == 'Gelb':
                self.root.ids['settings_content'].color = (0,1,0,1)
                print('Yellow selected')
            if value == 'Schwarz':
                self.root.ids['settings_content'].color = (0,0,0,1)
                print('Black selected')

SettingsApp().run()
Now it's time to play.
The function config.get(Panel, item) retrieves values from the menu and with the function on_config_change(self, config, key, item) can you update values right after they have changed in the menu.
If you take a look at the terminal you will see that the program is as well printing the changes.
This is of course only the tip of the iceberg but you see what is possible. Try to adapt it to your needs.
Source Code on GitHub
The latest code is available on GitHub